I’ve been back to shooting analog film again recently, after trying it many times and every time realizing it wasn’t for me. If you missed my past blog posts on film check out part 1 and part 2.
The cinematic look
What attracts me with film is the cinematic look some photographers achieve, something about the colors and the film grain.
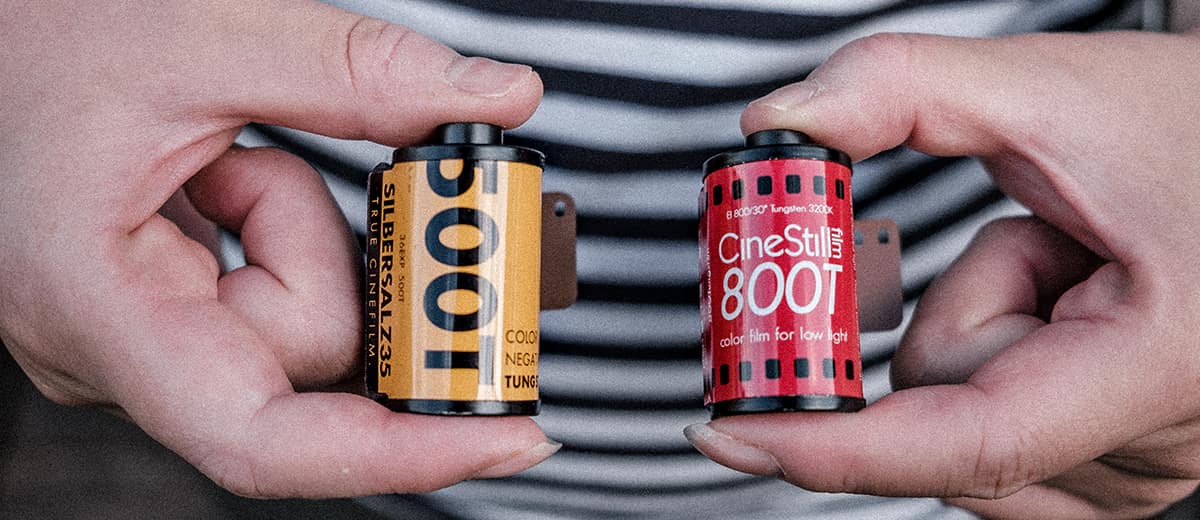
In the past I tried out Cinestill 800, a modified version of Kodak Vision3 500T that works with C41 developing. Vision3 is the film stock Hollywood has started using again for a lot of big movies, and it has a very cinematic look. Cinestill has some limitations but recently people have started to develop the pure Vision3 film using ECN2 for photography. One of those places is Silbersalz in Germany. I decided to give Silbersalz a try and also do some comparison with Cinestill.
The gear
In the past I tried many different 35mm and medium format film cameras. This time I learned from the past and got myself a modern setup. The Canon EOS 33V, the last pro Canon film camera produced. It got all the modern features that an early Canon pro DSLR has. From my past shooting I just had too many shots not in focus or photos where the light meter did a bad job. I know the Canon EOS 33V is not super inspiring to use, but it’s a really good camera. The Canon EOS 33V can even track fast moving subjects, the only auto focus film camera I ever tried that could do that.
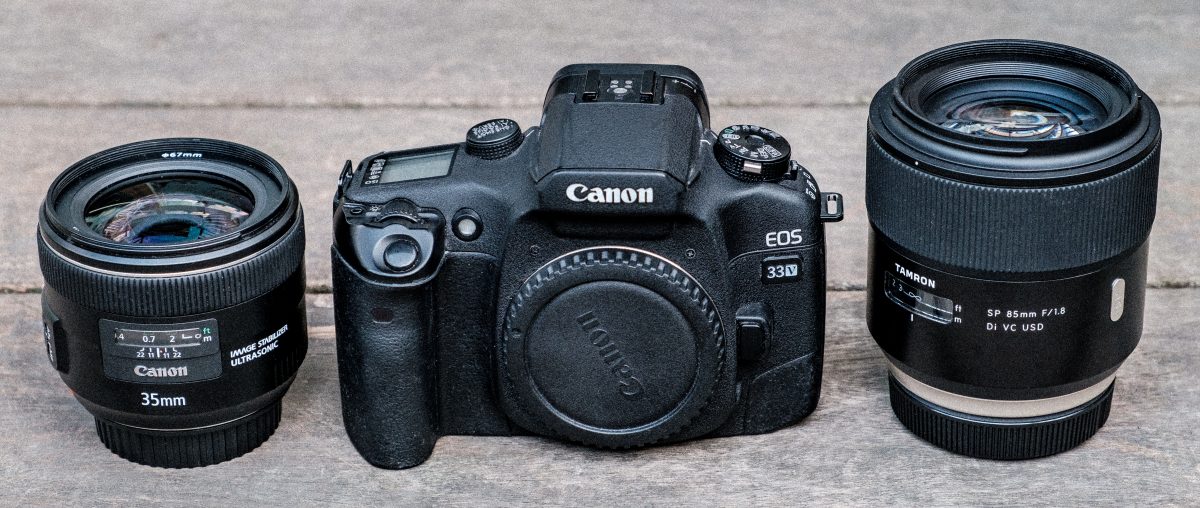
Another benefit is the big EF lens selection. I was gonna shoot mostly at low light, so I made sure the lenses I got had image stabilization. I got the Canon EF 35mm f2.0 IS USM and the Tamron SP 85mm F/1.8 Di VC USD. Both lenses are within reasonable price and also a pretty good size (not too big)
I really like the tactile feeling that older cameras give you with nobs and dials, and I understand why film shooters go for a Leica or something like that. But why not take advantage of modern features like image stabilization and fast auto focus?
But why choose 35mm over medium format? In the past I had bad experience with 35mm, because I used older cameras and lenses. But I really think the Canon EF mount system is a great choice for image quality. I didn’t made any direct comparison, but I almost feel some good sharp moderne EF lenses can match an old medium format camera.
I also think 35mm is more than enough for social media. On the other hand I don’t think medium format is enough for really enjoying your shots on a big monitor (maybe 4×5 or 8×10 cameras?), so I don’t see big benefit anymore of medium format.
Scanning
Scanning a very important part of film. In the past I used a Epson V500 fladfed scanner and got bad results.
This time I got a dedicated 35mm scanner, the Plustek Opticfilm 8100. Check out Kyle McDougall’s comparison of the scanner here. There are better 35mm scanners out there, like the Nikon Super Coolscan 5000 ED or Nikon Super Coolscan 9000 ED, but they where made back in 2004 and is extremely rare and very expensive.

Plustek Opticfilm 8100 is a very good scanner for the price. As far as I understand the benefit is that the sensor and lens is located directly under the film you scan. On a fladbed scanner a moving mirror is used to project the image to the sensor. The image quality on the Opticfilm is a lot better and it made me very excited to shoot film again. They are still in production and can be bought for 270 euro new. There is a newer Plustek Opticfilm 8200i model, it has the same image quality and more expensive but also has a dust removing feature. I didn’t have that good luck with auto dust removing in the past so I got the cheap model.
Silverfast 9 is a great scanning software a lot of people use, and you can claim it free on Silverfast’s website if you buy an Opticfilm scanner. One of the things I enjoy with Silverfast is the Negafix, that helps you get the color adjustment correctly when scanning. For Silbersatlz or Cinestill there is not profiles yet, but I use Kodak Max (based on what I read on online forums) and it works great. Remember to crop before scanning to get the right colors from Negafix, leaving film border can make Negafix misguess the colors.
Update: After scanning the photos and writing this post I realized that the Negafix profile I used was wrong, using Kodak Max (as recommended for Cinestill) doesn’t give the correct colors, I tested all the Kodak color profiles and think Kodak VR 100 looks the best. I recommend trying out one scan for each profile and seeing for yourself. See the photo below it has been scanned with Kodak VR 100 profile and saturation -40.
A thing I didn’t understand the last times I shoot film is that you have to add a lot of sharpening to film to get a sharp look. Turn sharpening all the way up, also turn the clarity slider up 50%, and maybe even add more sharpening to your main subjects. You will then really notice the film grain but it’s actually a look I’m staring to like. Sharpening only looks bad if you have underexposed your photos, then you get these blue grains that looks very ugly oversharpened.
A lot of people have started to scan their film using their digital camera. I bought a film holder from Essential Film Holder and tried it out but had bad results. Sharpness is at the same level as my Plustek Opticfilm 8100, but I couldn’t get the colors right. I did it in a dark room with the only light being from my led light panel (same model as I noticed other film shoots use), I tried Negative Lab Pro, and read many guides on how to do it, but no luck.

If you want the best of the best result you can get your film scanned at professional labs. The best should be drum scanners (have never tried that). The old professional scanners like Fuji Frontier SP-3000 looks very good (check out Sandy Phimester, he owns one and does the scans himself), my local lab uses that scanner but don’t look as good in my opinion.
Light meter
The most important part of shooting film is exposure and this is where most new photographers get it wrong. Expose for the shadows: In digital you have to expose for the highlights (they easily gets blown out), in film it’s the shadows you have to watch out for. In other words, you need to overexpose your shots.
I ended up buying Sekonic L-558R lightmeter used, I think that’s a must for landscape/cityscape photos where you can easily clip shadows or highlights. For portrait photos I used Canon EOS 33V’s build in meter, using center weighted metering (not exactly spot metering but close) + overexposed 1 stop. I turned out to work out very well, only in a few highly backlit situations was it underexposed.
If you want a moody looking image with dark shadows, you basically have to overexpose it in camera but underexpose it in post processing. Otherwise you will get those muddy looking shadows with ugly blueish grains.
White balance and color filters
On a digital camera your white balance is normally set by your camera automatically. On film you set it based on what film you load in your camera. For films based on Kodak Vision3 500T the film is for tungsten lighting, meaning 3200k, which is the lighting you get indoor with old types of lightbulbs. Led light is closer to florescent light (4200k) which will give you a more blue look unless you adjust it. And if you shoot it in daylight, a sunny day is 5400k and shade is 6500-7000k, meaning that shooting tungsten film in daylight will give you completely blue photos.
I heard several people shooting Cinestill or Vision3 500T that used an orange filter called 85b. It does the while balance adjustment in camera, and according to sources I read it was better to do it that way. People mentioned that the greens would get lost if you did it when scanning and not in camera.

I bought a Tiffen 85b 67mm ($37.95 from B&H, the only places I could find them), all the outdoor shoots I took was using the 85b.
Later I did a test shooting a scene with the 85b (link) and compared it to the same shot without the filter (link). My scanning software Silverfast auto corrected the white balance, and to be honest I can’t see any difference. Maybe the people that had the problem did something wrong when scanning? The lesson is not to use a filter, just fix it in post.
SILBERSALZ35
Silbersaltz is a German company that offers a service that gives you the ability to shoot true Kodak Vision3 film. When you buy a film from them, you get the film but also the developing and scanning for the same price. They offer 4 types of film at different ISO’s, 50D, 200T, 250D and 500T (D = daylight 5400k, T = tungsten 3200k). I shoot in darker conditions so I’m only interested in the 500T.
When you order, they ship you the film. When you are done with the film, you ship it back, they develop it, scan it and shares a dropbox folder with you that includes the scans. If you want your negatives returned you pay for shipping and they ship it back to you. Prices are a bit high, but if you think about it I think prices are reasonable compared to how much work they have to do, and it’s a small company.
The scans are done using their BlackMagic film scanner, they are made for scanning 35mm film for movies, but they use them for stills. The scans you get are both in jpg and in a raw format. I heard people saying that the scans was a bit disappointing, and I agree. The colors looks very flat with this magenta tint I can’t get rid off, quality is maybe at the same level of my Epson V500 scanner but not as good as my Plustek Opticfilm 8100.

The developing are done using ECN2 and not C41, it gives you a better result with more dynamic range. And the dynamic range is truly great (if exposed correctly and not underexposed). I really understand why Hollywood uses this film.
A downside compared to Cinestill 800 is the lower iso, 500 vs 800. Cinestill says their film is faster because they remove the remjet layer of the film. Iso 800 is a great speed for shooting in low light situations, iso 500 is often too slow.
I heard other people saying that the colors are different than Cinestill, and that’s also what I noticed. First I thought I had scanned my Cinestill with a wrong settings and tried several times to fix it. But there just is a difference and I much prefer Silbersaltz.
All in all SILBERSALZ35 offers a great service. The only minus is the price and that you have to ship your film to Germany every time (what if it gets lost during shipping one day?). But for me this is the best option so far.
Alternatively you could buy a Kodak Vison 500T film online. Just like Silbersatlz, some resellers also offers you to buy consumer versions of Kodak Vision3, they buy bulk movie film rolls from Kodak and cuts it into smaller rolls in a dark room. On ebay there is a few of those resellers. Developing is possible at home, there is a few ECN2 developing kits you can buy.
Cinestill 800
Cinestill is Kodak Vision3 with the remjet layer removed, it means you can process it in normal C41 labs. That makes it more easy to deal with. You don’t have to ship your film to some special lab, you can just use your local lab.
The film type might be the same as Kodak Vision3, but the development process is different, which results in a different look. The colors are different, Kodak Vision3 has more “realistisc” colors and Cinestill 800 are something different (more filmic look?). Cinestill also has the known halations (red areas around highlights), it can be good and can be used to give a more cinematic look, but it can also be bad because all your clipping highlights will get this red glow. Cinestill is also more contrasty than Kodak Vision3, Cinestill will look better right out of the box, but Kodak Vision3 has more options in post because of the higher dynamic range.
Cinestill 800 is based on Kodak Vision 500T, Cinestill claims that removing the remjet layer gives a faster film (making it from iso 500 to 800). I’m not sure about that. When I shoot Cinestill at iso 800 it often looks too underexposed, so I tend to overexpose it +0.5 or +1 stop, and then underexpose it in post. Of cause overexposing it is risky, highlights clips easy, and i.e. overexposing a face will give red ugly skintones, not good. But when all of that is said, I still like Cinestill, probably prefer it.
I’ve talked about Cinestill 800 before on this blog, I recommend going back and reading those posts also.


Conclusion
2023 Update: Hello this is me again but from the future. I used to recommend the Canon EF system for analog film for it’s super sharp lenses compared to vintage lenses. But I changed my mind, the moderne lenses like Canon EF has too much contrast for film (gives you less dynamic range), has another kind of color rendition that fit digital but not analog film, and images are too sharp and lack character. My advise is to use lenses with more character (for me I like the Zeiss lenses on the Contax / Yashica SLR lineup), shoot the lenses wide open or close to wide open, and get sharper results from your scanning by scanning with a digital camera and using Negative Lab Pro. Will write another blog post about it soon.
Pros:
- The thing I like the most with film is the experience of shooting film. You are 100% dedicated to the shooting experience because you have to do it right. Every time I got out and shoot film it becomes a good memory for me.
- I think the look of film can be very charming.
- Both SILBERSALZ35 and Cinestill 800 are great choices. If you want the best I think SILBERSALZ35 is better (dynamic range and colors) but also almost too clean and modern looking. If you want something more convenient and dreamy looking Cinestill 800 is also a great choice.
- I can recommend the Canon EF system with some modern lenses, really good setup. Generally get a Canon EOS camera from the end of the 90s and not the entry models.
- Shooting projects with film makes more sense – film shooters often have a certain subject they are after, they make projects only shooting one subjects. Each photo might not be that interesting, but together they becomes something bigger, and they fact that they are shoot on film gives it something extra (something emotional). You could do the same on digital, but it lacks that emotional feeling somehow.
Cons:
- The biggest cons for me is the time it takes for me to scan and edit my film photos. Removing dust from in Photoshop or adjusting the color slides in Camera Raw. I work as a software developer for a living and I prefer to sit in front of a computer as little as possible. Yes you can get your lab to scan and send your photos to you, but I didn’t have good experience with that.
- You will miss a lot of moments with analog film, things you could easily have captured with digital. Even if you capture it, you could have captured a moment where the person closes his/her eyes, or where the focus is a bit off.
- Film is not that sharp, you have to add a lot of sharpening to get it looking sharp. I normally shoot my aperture wide open but with film you almost have to stop down to get some sharpening in the photo. Something I would do differently another time.
For me personally: It’s a fun experience to shoot film again, it takes me out of my comfort zone and makes me reevaluated the photography I normally shoot. But besides the fun experience I quickly get enough of it, just like last time. But there will probably be a part 4 in a few years.